Obtaining IP Address in Android Devices & Troubleshooting Tips for Faster Network Connection
Connecting to an existing Wi-Fi network should be easy on mobile devices, especially Android. As long as the device has the proper credentials, such as wifi password, the device should connect without any issue.
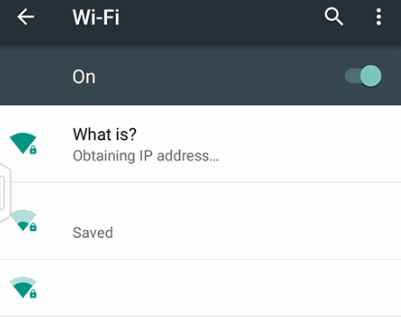
However, there are times that even with the right credentials, errors happen such as its ability to obtain an IP address.
Fortunately, there are a few simple solutions to consider in handling this tech problem. Familiarity with the network is a must but these solutions should address this concern.
It All Starts with the Networking Device
An Android device that cannot easily connect to the network is mostly a problem related to the network. Network devices such as routers have a common role: connecting each device to the network and to the internet. However, their capability differs depending on the make and model.
When an Android phone cannot obtain an IP address, the easiest solution is to restart the router. This process will force the router to reestablish connection in the network while assigning a different IP address to each device.
Make sure to switch on the Android device's wifi before restart so that it could automatically connect to the router. It's also important to make sure that the router goes through a power cycle - this can be done by removing the router from the plug for at least 10 seconds before plugging it back in.
Network Security Standards
Aside from a router power cycle to reestablish the IP address of each connected device, it is also possible that the network has encryption problems. This is especially true for relatively older wireless routers. If an Android device cannot obtain an IP address, making changes to the network encryption option is also a possible solution.
To do this, refer to the router's user guide in order to access the network security protocols. Generally, there are three types of Security Standards used in today's network: WPA, WPA2 and WPA3. The best security and fast connection is with WPA3 but there are devices that do not support this security standard feature. According to Android.com, devices below Android 10 only support WPA2 while WPA3 will get Android support starting Android 10. Check the phone's Android version to make sure which security standard it supports. It is also important to check the routers' Security Standard because it might force devices on WPA3 - a setting that's not supported below Android 10.
Aside from network security standards, also check if the router has MAC Filtering activated. This feature restricts any device from connecting to the network unless their MAC
Manually Assigning an IP Address
Manually assigning an IP address or Static IP is also another option to force the router to accept a specific device through an IP address. This setting is often set-up by network administrators in order to establish a database of devices that needs to be monitored.
In order to do this, refer to the router guide in order to access the Static IP options.
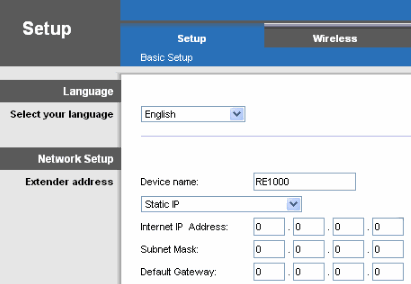
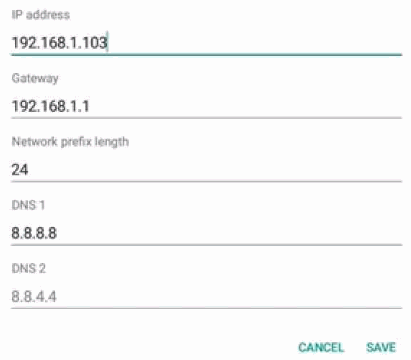
Assign an IP address manually by providing the correct information to each field. As already said, this setting is ideal only for network administrators or those who are familiar with the network setup. A single wrong number will prevent the device from connecting to the wireless network. The same IP address should be used in the static setting in the android device after establishing connection.
These are the popular options to consider when the Android device has a problem obtaining an IP address. Start with the simplest solution first before moving up to relatively challenging solutions. Make sure to check the router's manual to properly configure the network.
Posted on
