Setting Up a Static IP Address – What You Need To Know
A properly set-up network ensures that each connected device can connect to the internet or the network connected device with ease. Each device is assigned with an IP address that allows it to be identified by the network so it could determine its access privilege and other network settings.
Normally, network set-up is done automatically with a modern router since each connected device is automatically provided with an IP address. The device receives a "dynamic IP address" in this setting and this type of IP address changes every time a router restarts or the device reconnects with additional network users.
On the other hand, there are situations wherein a "static IP address" may be required to each connected device. This is often setup for security purposes such as work file access even on remote locations as well as increased stability of internet access. Static IP address is also a good option to prevent IP address conflict or sharing of one IP address of two devices in the same network.
Setting up a static IP address differs on each device but it often goes through network settings and changing the IPv4 address. For example, static IP address in Windows 10 by opening Control Panel > Network and Internet > Network and Sharing Center > Click on Connection Type of the Connected Device of the Network > Properties > Internet Protocol Version 4 (TCP/IPv4).
If this is the first static IP configuration, the tick is "Obtain an IP address automatically". Click on "Use the following IP address:" to manually configure the information.
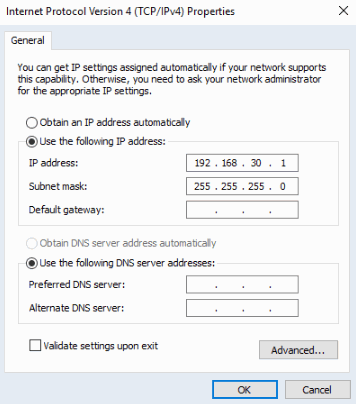
To ensure that the configuration is correct, click on "Validate settings upon exit" and click "OK". Ethernet or WIfi Icon located in the Notifications Pane and Action Center (lower right) will show a stable connection.
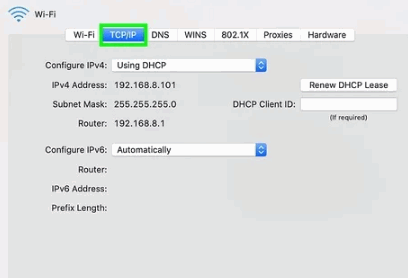
For Mac, manual configuration is accessed through the TCP/IP tab and select "Manually".
For Android, open the Wifi settings and click on the options button on the connected network - usually the three dots or an arrow (varies per manufacturer) and look for the button that will allow manual changes to the IP address.

How to Ensure Proper Static IP Configuration
When setting up a static IP address configuration, it is very important to take note of the IP address of each connected device. Create a map and write the IP address of each device with manual configuration. While the IP address of the device is easily accessible, network troubleshooting will go faster when the needed information is readily available. Also make sure to check the network administrator for additional information and configuration on IP address and subnet mask.
The beauty of the static IP configuration lies in the fact that network administrators can freely choose the number as long as they range from 0 to 255. But there is a recommended configuration to ensure smooth connectivity. According to Cisco it is highly advisable to avoid ending the IP address with 1 or 254 since they are usually automatically assigned by network. The network can be vulnerable in this setting because IP address based attacks usually start with the default IP address. The number 255 should not be used as well because they are often used for wider services while 0 is often used for network configuration.
Last but not the least, setting up a static IP configuration should be done only when necessary. Work from home set-up for secure file access, a better VoIP connection or a more stable internet connection are only some of the reasons why a static IP address is recommended. Modern routers especially for home use already come with a robust dynamic IP address configuration that ensures smooth internet connection and stability.
Posted on
